The 2022 Guide for Safe & Effective Discord Community Moderation.
Getting Started as a Discord Community Manager - No Coding or Subscription Necessary - with Server Templates!
Table of contents
- 1. Become a Discord super user.
- 2. Familiarize yourself with bots.
- 3. Require reaction roles for users to view your server.
- 4. Minimize the need for users to use DMs.
- 5. First steps for making new servers super safe:
- 6. Set up auto moderation:
- 7. Clearly distinguish the team from the community.
- 8. Monitor vanity links & analytics for raids.
- 9. Make your server a reliable source of information.
- 10. Use Discord as a promotional tool for your other socials, events, and more!
- ➡️ Another relatively new feature worth utilizing are forums, a great way to keep conversations organized.
Discord has dominated the online gaming world ever since it's release in 2015, positioning itself to be the primary platform for all digital communities now. What makes Discord especially posed for effective community management is it's emphasis on connecting people online who are brought together by a common interest -- whether that is video games, cryptocurrencies, or NFTs. It features channels for both individual and group communication, categories for grouping members, features for promoting events and making announcements, and countless bots and plugins for additional features. With 150 million monthly active users, 19 million active servers per week, and 4 billion server conversation minutes daily as of February 2022, Discord is a the platform for building & managing online communities.
This guide intends to take a web3 Discord admin from zero to hero with effective community management in mind. LFG! 🚀
1. Become a Discord super user.
Here is a checklist of steps for getting started as a professional Discord community moderator:
- Familiarize yourself with the platform's server settings, user settings, and privacy settings.
- Set up your preferred notification settings on every server to prevent "notification overload" and simplify your job.
- Create test servers to learn how to create channels, categorize them, set permissions, and use bots. You can use these test servers to set up templates for easily generating new servers.
- Develop a deep understanding of Discord permissions, as this is the essence of learning how to properly moderate your server. Additionally, roles are essential for visually separating community members from staff and for grouping community members into smaller, functional subgroups.
- Understand how invite links work and set up your own vanity link. Your vanity link is a custom invite link to your Discord server. By tracking invite links, you can analyze the incoming flow of new server members, and disable any links that may be being used for raids.
- Join other servers for inspiration!
- Learn how to create webhooks and post them to your server. Webhooks provide an easy way to get automated messages and data updates sent to a text channel in your server. Webhooks can be done manually or with bots, I personally like this handy online tool for manually posting webhooks.
- Familiarize yourself with the developer analytics, this will be useful for tracking member growth and identifying raids.
- Stay informed with the latest Discord updates and make sure to follow Discord on social media.
- Lastly, developers interested in building with the Discord API can get started in the official Discord Developer Portal docs.
2. Familiarize yourself with bots.
Bots are essential for adding personal features, both functional and fun. They can automate moderation, provide security measures, post and automatically update webhooks, add fun games & features, facilitate communication between server members and staff, be customized to align with your branding, and much more.
Here are some of my favorite Discord bots:
- ModMail, an open-source bot that enables communication between server members and staff. Use ModMail to request staff for help. I particularly like the logger feature which saves all previous conversations into a transcript for future reference.
- GearBot, a Discord bot that specializes in moderation and permissions. In addition to the classic moderation functions such as
kickandban, GearBot can help you configure advanced infractions. prevent raids, and keep track of previous actions taken by moderators. - MEE6 and carlbot are among the most popular bots for automating moderation, adding fun features, webhooks, and much more. These bots also feature an online dashboard so they can be easily handled on the web rather than commands in your server, making them more user-friendly.
- Other bots I've used and can recommend are Tickety for tech support and Sesh for tracking events.
- Check out more bots on Discord bot marketplaces.
Keep in mind that bots are created by independent creators and not Discord, therefore you should carefully evaluate bots before inviting them to your server.
Pro Tip: When adding bots to your server, create a role specifically for bots. This way you can easily edit permissions for all of your bots, rather than one at a time, which becomes tedious with the more bots and channels you add.
3. Require reaction roles for users to view your server.
Reaction roles are roles that are automatically assigned to users who react (with emojis) to a message and help verify if a new member is a human or a bot. When setting up reaction roles, it's important to consider the user flow of new server members entering your server. Here are steps to get started with setting up reaction roles:
Make your server private to everyone except for a few core channels and a verification channel. The verification channel is where your reaction roles will live. New members will have to select a reaction role in order to gain entry to the rest of your server.
Using bots is the easiest way to create reaction roles. Each bot will have its own instructions on how to use it to create your reaction roles.
Automatically grant new members who successfully complete the reaction roles a new
Verifiedrole, which will give them access to the rest of their server. Make sure to keep your reaction verification accessible, so don't ask to react to a specific color and make sure that emojis are universally displayed similarly on all platforms.
While spam bots can still enter your server, requiring a reaction role will block many of them from viewing your servers contents and significantly decrease the number of bots interacting within your servers.
Pro Tip: Don't make the first emoji in your reaction role message your Verified role. Spam bots typically bypass this because being programmed to simply "react to the first emoji" is quite easy. Make your Verified role the second emoji option, at the least.
4. Minimize the need for users to use DMs.
Many bots (such as the Intro-Bot or the Captcha Bot) require sending a DM for verification. I highly advise against this, especially for web3 communities.
Not only should you encourage users to turn off their DMs for safety, but VPNs often block these DMs so they are not a reliable method for engaging users. Additionally, Discord DMs are one of the primary avenues for scammers to reach out to server members and pose as staff and technical support.
If your community centers around crypto, NFTs, web3, etc., please discourage your users from turning on DMs for your server.
Lastly, make it a well-known rule that your community staff will never DM a server member first. We want to minimize any chances bad actors have to take advantage of our web3 communities.
5. First steps for making new servers super safe:
After configuring your server channels, permissions, and roles, configure these Discord settings for basic safety & scam reduction:
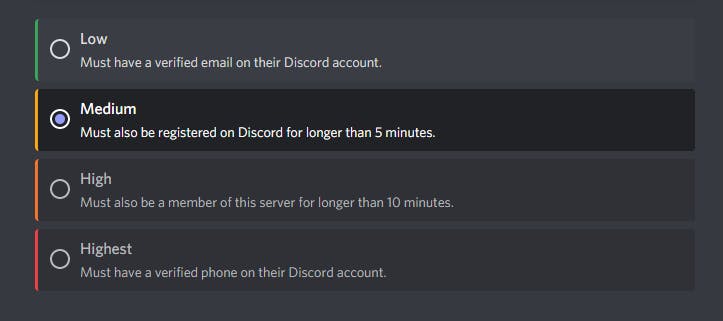
- Set moderation level to at least medium.
- Require all admin to have 2FA for Discord.
- Turn on the explicit media content filter, which automatically detects and deletes images and uploads deemed explicit.
- Set up a membership screening welcome screen that forces new members to agree to your rules before interacting with your server.
- Create a channel for Rules & Guidelines.
- Create a channel specifically for reporting anyone who breaks the rules and spammers. Direct users there with automated safety reminders and mention it in your rules! Make sure to check this channel daily and ban any questionable characters. Not only will this help filter bad actors, but providing a channel for users to self-report ensures that the community feels heard and cared for by managers.
- Turn on the community settings! Enabling Discord Community will give you access to additional tools and insights for community managers.
These settings combined with reaction roles and auto-moderation will significantly decrease a community members chances of being scammed inside your digital community.
Pro Tip: Avoid using Discovery if you are a crypto or NFT community. This has been known to lead to spam and raids in web3 servers.
6. Set up auto moderation:
Provide additional and automated moderating using bots such as GearBot, Mee6, and Carlbot. These basic auto-moderation settings will provide an excellent foundation for getting started with auto-moderation:
- Limit sharing links to reduce spam.
- Don't allow too many messages be sent within a short amount of time (~1min).
- Ban members with names like "HelpDesk", "Customer Care" or anything posing as technical support.
- Automate safety precautions reminders in chat channels (example pictured below).
Examples of safety reminders to automate:
- Never share your wallet seed phrase, private keys, or personal details with anyone!
- Beware of crypto scammers who will message you and pretend to be technical support!
- Do not click suspicious links. An automated safety reminder is also an opportunity to add personal touches. While communicating safety precautions is essential for keeping our digital communities safe, it doesn't have to be boring or depressing. Mix in some community branding and make it a little fun!
Learn more about moderation at Discords Moderation Academy.
7. Clearly distinguish the team from the community.
In order to keep your server safe and as a reliable source of information, you need to separate your team from the community visually. This can be accomplished by:
Turning on the option to 'Display role members separately from online members' within your server's 'Roles' settings.
Communicating clearly what users can expect if they need assistance or to communicate with the team. For instance, note in your rules and automated safety reminders that staff has a specific role. Explain what to expect when speaking with a staff member, such as staff never DMing members first, or asking for personal info. We want to limit any chances for bad actors to pose as the team and take advantage of the community.
8. Monitor vanity links & analytics for raids.
When server members 'Invite People' to your server, an invite link is generated specifically for them. These links are listed and monitored in the Discord Developer Server Insight console. You can monitor how often these invite links have been used and deactivate them if needed.
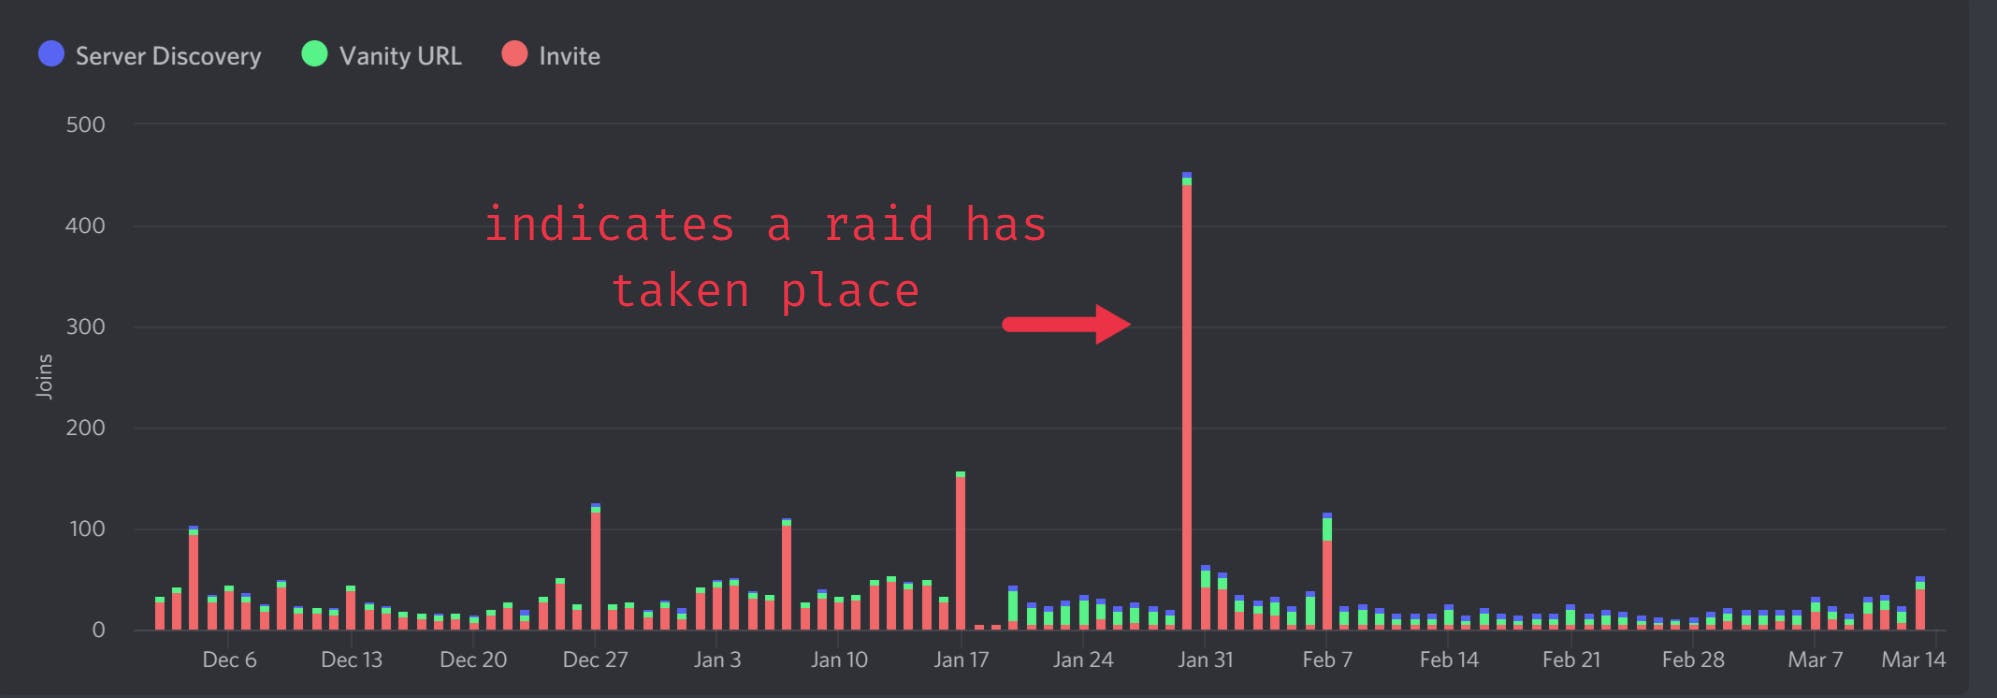
Discord 'raids' are when an army of bot accounts mass join your server. With reaction roles, these bots won't be able to interact with the majority of your server and engage with your community. But they can still join your server and view public channels.
Regularly check your Discord Developer Server Insight console for raids. Raids will look like a random and major spike in new members that differs than your normal growth trends. If you detect a raid, analyze your invite links and deactivate any that appear to be used in the raid (they will have a high invite count similar to the number of new members created from the raid.)
9. Make your server a reliable source of information.
Not only is Discord a place for online communities to gather, but a source of information for your product. Therefore, you should make a dedicated category of channels specifically for general information. These can contain your welcoming channels, such as the verification channel and your rules, as well as informational channels for official links, FAQs, and resources.
➡️ Most importantly, always consider the user flow of your server. If a member needs technical help, wants to chat about a particular topic, share memes, or simply learn more about your brand -- which channels are they likely to use? We can categorize our channels intuitively to help guide users in the right direction.
Not only is the user flow important for community member satisfaction, but it's the first impression of your digital community. Make onboarding easier for community members by creating a channel in your general information category specifically for new members. Title this channel 'start-here' or something similarly, and make this channel visible upon verification. Here, using webhooks, bots, or just a fun message, warmly welcome new members and clearly communicate the intended purpose of each channel, how to communicate with the team, where you'll find official news & updates, and where to report bots & scammers.
Pro Tip: Be mindful of not making too many channels, as we don't want to overload users. Additionally, I highly suggest having a category specifically for chatting in other languages so that users from all over the world can enjoy your server!
10. Use Discord as a promotional tool for your other socials, events, and more!
Your Discord server is just one tool in your community management arsenal. Be sure to promote your other social links, tools, such as social media accounts on Twitter, Instagram, and Youtube on Discord, by linking them in your official links channel and automate linking social media posts in special social media channels. Next, utilize special community server features, such as the special announcement channel and events feature.
➡️ The 'announcement' channel can be embedded into other servers and followed by users, making it ideal for publishing important updates. Share the latest announcements here and be sure to click 'Publish' on each of your announcement chat boxes so that it's sent out to all of your followers!
➡️ Try out the relatively new 'events' feature to highlight community events at the top of your server. List all of your events, such as AMAs, giveaways, meetups, etc., and any current events will be displayed in your server banner for all members to see.
➡️ Another relatively new feature worth utilizing are forums, a great way to keep conversations organized.
Final Thoughts
- Discord is an excellent tool for digital community building as long as moderators are considerate of the user flow of server members. Make sure that your server's flow, starting from a new members first steps, to becoming a committed community member, is both seamless and safe.
- You can never "stupid-proof" your server too much. especially in web3! There is never "too many" safety warnings & precautions in a web3 server. Keeping things fun and aligned with your personal branding will make your server awesome, even with all of the warnings. Remember that it's an even worse look to let your community get endlessly wrecked by bad actors.
- Discord moderation is often referred to as the "help desk of web3". But we want to prevent users from needing help in the first place, by helping them help themselves.
- Remember that web3 is evolving fast and Discord was not designed specifically for this industry. Keep updated on other major platforms in the web3 space, such as matrix.org. Meanwhile, be sure to check Discord's blog for updates on all the latest features.
🌟 Web3 Discord Server Templates 🌟
Check out my free Discord server templates fit for any web3 community. 😊 Included are channels, categories, and permissions. No content or embeds. Clicking on these links will navigate you Discord to create a new server.
- Web3 Networking Starter Discord Server Template
- Multiple Roles Web3 Starter Discord Server Template
- Single Roles Web3 Starter Discord Server Template
If you have any questions, feel free to reach out to me on Twitter!


